Views: 222 Author: Tina Publish Time: 2025-01-19 Origin: Site


Content Menu
>> Setting Up the LiquidCrystal Library
● Exploring Different Types of Displays
● Troubleshooting Common Issues
● FAQ
>> 1. How do I adjust the contrast on my LCD?
>> 2. Can I use different sizes of LCD displays?
>> 3. What if my LCD doesn't display anything?
>> 4. How do I create custom characters?
>> 5. Can I control multiple LCDs with one Arduino?
Controlling an LCD display using an Arduino board is a popular project among electronics enthusiasts and beginners alike. This guide will walk you through the steps required to connect, program, and utilize an LCD display with your Arduino. We will cover the necessary components, wiring diagrams, example codes, and practical applications, ensuring that you have a comprehensive understanding of how to control an LCD display with Arduino.

Liquid Crystal Displays (LCDs) are widely used in various electronic devices due to their low power consumption and ability to display text and graphics. The most common type of LCD used with Arduino is the 16x2 character display, which can show 16 characters per line and has two lines.
- Character Display: Capable of displaying characters and symbols.
- Backlight: Most LCDs come with a backlight for visibility in low-light conditions.
- Interface: Typically uses a parallel or I2C interface for communication with microcontrollers.
To get started with controlling an LCD display using Arduino, you will need the following components:
- Arduino Board (e.g., Arduino Uno)
- LCD Display (16x2 or similar)
- Breadboard
- 10k Ohm Potentiometer (for contrast adjustment)
- 220 Ohm Resistor (for backlight)
- Jumper Wires
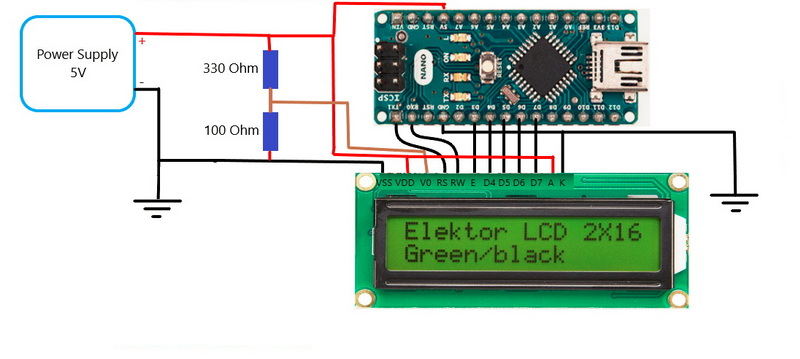
Before diving into coding, let's set up the hardware. Below is a wiring diagram for connecting a 16x2 LCD to an Arduino Uno.
1. LCD VSS (Pin 1): Connect to GND on Arduino.
2. LCD VDD (Pin 2): Connect to +5V on Arduino.
3. LCD VO (Pin 3): Connect to the middle pin of the potentiometer.
4. LCD RS (Pin 4): Connect to Digital Pin 12 on Arduino.
5. LCD RW (Pin 5): Connect to GND on Arduino.
6. LCD Enable (Pin 6): Connect to Digital Pin 11 on Arduino.
7. LCD D4 (Pin 11): Connect to Digital Pin 5 on Arduino.
8. LCD D5 (Pin 12): Connect to Digital Pin 4 on Arduino.
9. LCD D6 (Pin 13): Connect to Digital Pin 3 on Arduino.
10. LCD D7 (Pin 14): Connect to Digital Pin 2 on Arduino.
11. Backlight Pins: Connect +5V and GND through a resistor.

Now that we have the hardware set up, let's move on to programming the Arduino to control the LCD display.
Arduino provides a built-in library called `LiquidCrystal` that simplifies controlling character-based LCDs.
Once you have mastered the basics, you can explore more advanced features such as:
- Scrolling Text: Use `lcd.scrollDisplayLeft()` or `lcd.scrollDisplayRight()` for scrolling text across the screen.
- Custom Characters: Create custom characters using `lcd.createChar()`.
- Control Cursor: Use `lcd.setCursor(column, row)` to position text at specific locations.
Controlling an LCD display opens up numerous possibilities for projects:
- Data Display: Show sensor readings like temperature or humidity.
- User Interfaces: Create simple menus for user interaction.
- Status Indicators: Indicate system status or alerts in real-time.
As we navigate through the pin description and connection between the Arduino and LCD display, we begin to see how text and characters appear on the LCD screen. The integration of technology and creativity can lead us toward exciting projects that enhance our learning experience.
One interesting project idea is creating a digital thermometer using an LM35 temperature sensor connected to an LCD display. By uploading code onto the Arduino board, you can read temperature values from the sensor and display them in real-time on the LCD screen.
Another engaging project could be designing a simple calculator using an LCD screen and a keypad. After interfacing both components with the Arduino board, users can perform basic arithmetic operations while viewing results directly on the display.

While character-based LCDs are common in many projects, there are other types of displays worth exploring:
- OLED Displays: These provide higher contrast and can display graphics in addition to text.
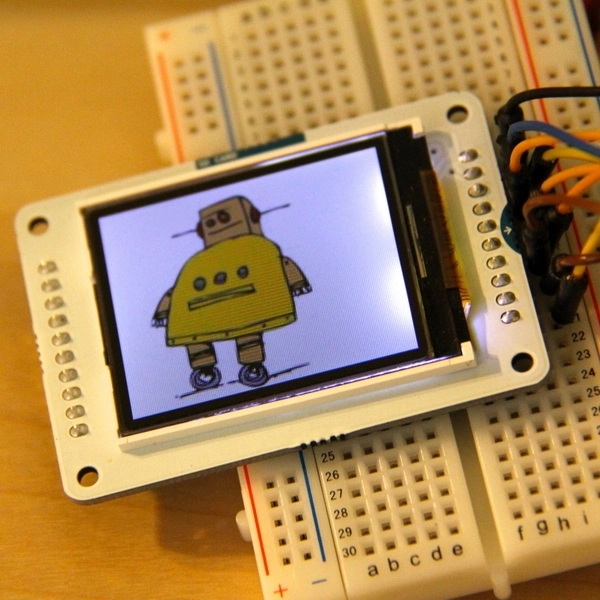
- TFT Displays: These are capable of showing full-color images and are suitable for more complex graphical interfaces.
Each type of display has its own advantages and challenges when interfacing with an Arduino board.
When working with LCD displays and Arduino boards, you may encounter some common issues:
- No Display Output: Check power connections and ensure that all pins are correctly wired.
- Incorrect Characters Displayed: Verify that you are using the correct data format and that your connections match your code configuration.
- Contrast Issues: Adjust the potentiometer connected to the VO pin until characters become visible.
Controlling an LCD display with Arduino is not only straightforward but also a rewarding experience that enhances your understanding of electronics and programming. By following this guide, you should be able to set up your own projects using an LCD display effectively.
With practice, you'll find numerous applications for integrating displays into your projects—whether it's for displaying sensor data or creating interactive user interfaces.

- You can adjust the contrast by turning the potentiometer connected to the VO pin of the LCD.
- Yes, you can use various sizes such as 20x4 or others; just ensure you modify your code accordingly.
- Check your wiring connections and ensure that you have provided power and ground correctly.
- Use `lcd.createChar(index, characterArray)` where `characterArray` defines your custom character in a byte array format.
- Yes, but you'll need additional pins for each display unless using I2C communication which allows multiple devices on two wires.
[1] https://projecthub.arduino.cc
[2] https://www.instructables.com/Arduino-How-to-Connect-and-Control-an-LCD-Displays/
[3] https://www.electronicsforu.com/arduino-projects-ideas
[4] https://robocraze.com/blogs/post/exploring-lcd-displays-and-arduino-uno
[5] https://www.instructables.com/How-to-use-an-LCD-displays-Arduino-Tutorial/
[6] https://robocraze.com/blogs/post/5-arduino-project-ideas-expert-level
[7] https://www.linkedin.com/pulse/lcd-arduino-display-what-its-functions-how-choose-
[8] https://docs.arduino.cc/learn/electronics/lcd-displays
[9] https://forum.arduino.cc/t/advanced-programming-of-lcd-display/143529
[10] https://www.allaboutcircuits.com/projects/interface-an-lcd-with-an-arduino/
[11] https://www.crystalfontz.com/products/arduino-lcd-displays.php
[12] https://howtomechatronics.com/tutorials/arduino/lcd-tutorial/
[13] https://www.hackster.io/Rau7han/best-arduino-projects-2020-advanced-intermediate-level-to-cb823a
[14] https://core-electronics.com.au/guides/use-lcd-arduino-uno/
[15] https://www.electro-tech-online.com/threads/adding-lcd-code-display-on-my-arduino-project-clothes-dryer.160474/
[16] https://duino4projects.com/advanced-view-arduino-projects-list/
[17] https://www.youtube.com/watch?v=u-bsJl0atls
[18] https://www.reddit.com/r/arduino/comments/v5u0y5/advanced_arduino_resources_going_beyond_the/
This comprehensive article answers the question "Can I Upgrade My E-Bike LCD Display Easily?" by exploring display types, compatibility, practical upgrade steps, troubleshooting, and maintenance tips. Boost your riding experience and get the most from your LCD display e-bike with the best current advice, illustrations, and video guidance.
This comprehensive guide explores the troubleshooting and repair of backpack LCD display issues, covering blank screens, flickers, garbled text, address conflicts, and more. It offers stepwise solutions and practical videos to help users swiftly restore functionality in their hardware projects.
Discover why the Sharp memory LCD display outperforms traditional LCDs with lower power use, unmatched sunlight readability, robust reliability, and a straightforward interface. Learn about its technology, applications, pros and cons, integration tips, and get answers to common engineering questions.
OLED displays, though admired for their visuals, may cause digital eye strain or "OLED screen eye tire" during extended use because of blue light, potential PWM flicker, and intense color/contrast. By using optimal settings and healthy habits, users can safely enjoy OLED with minimal discomfort.
Does displaying a white screen on an LG OLED TV fix persistent burn-in? The answer is no: true burn-in results from irreversible pixel wear and chemical aging. The best practice is to use preventive features, moderate settings, and varied content to safeguard screen health. For severe cases, panel replacement is the only cure.
An in-depth guide to the LCD display bezel: its definition, history, materials, structure, and growing role in display design. Explores bezel importance, types, aesthetic trends, maintenance, and innovation, offering expert insights—including an expanded FAQ and practical visuals—to help users understand its unique place in technology.
This article provides a complete, practical guide to diagnosing and fixing non-responsive SPI LCD displays using methods including hardware validation, logic level correction, library configuration, and advanced diagnostic tools. Perfect for hobbyists and engineers alike.
LCD display liquid coolers deliver top-tier performance with visually stunning customizable LCD panels that display system data and artwork. They suit enthusiasts and streamers aiming for unique builds but may be unnecessary for budget or basic systems. The price premium is justified by advanced hardware, software, and customization features.
Black bars on an OLED screen do not cause burn-in as those pixels are switched off. Only with excessive, repetitive content does minor uneven aging become possible. Varying viewing habits and enabling panel maintenance prevents problems in daily use.
OLED TVs provide spectacular picture quality but rely heavily on the quality of the video input. Most cable broadcasts are limited to lower resolutions and compressed formats, so an OLED screen connected to a regular cable box will look better than older TVs but may not realize its full potential. Upgrading cable boxes and utilizing streaming services can unlock the best OLED experience.
OLED screen burn-in remains one of the key challenges inherent in this display technology. While no universal fix exists for permanent burn-in, a blend of app-based tools, manufacturer features, and maintenance practices can help reduce appearance and delay onset. Proper prevention strategies and use of built-in pixel shift and refresher tools offer the best chances of avoiding this issue.
This article comprehensively explores will OLED screen burn in over time by explaining the science of OLED displays, causes and types of burn in, manufacturer solutions, prevention tips, and real-world user experiences. Burn in risk does exist, but modern panels and user habits greatly reduce its likelihood, making OLED an excellent and long-lasting display choice.
This article provides an in-depth guide to selecting the best LCD display driver IC for various applications, covering driver types, key features, leading manufacturers, integration tips, and practical examples. It includes diagrams and videos to help engineers and hobbyists make informed decisions about LCD display driver selection.
Dead pixels are a common type of LCD display defect, caused by manufacturing faults, physical damage, or environmental factors. While stuck pixels may be fixable, dead pixels are usually permanent. Proper care and understanding can help prevent and address these issues.
This comprehensive guide explains every symbol and function found on e-bike LCD displays, using clear explanations and practical tips. Learn to interpret battery, speed, PAS, error codes, and customize settings using your e-bike LCD display manual for a safer, smarter ride.
This comprehensive guide explains how to set an LCD display clock, covering everything from hardware setup and wiring to coding, troubleshooting, and creative customization. With detailed instructions and practical tips, you'll learn to confidently build and personalize your own LCD display clock for any setting.
This article explores whether OLED laptop screens are prone to burn-in, examining the science, real-world evidence, prevention methods, and lifespan. It provides practical advice and answers common questions to help users make informed decisions about OLED technology.
Displaying a black screen on an OLED TV will not cause burn-in, as the pixels are turned off and not subject to wear. Burn-in is caused by static, bright images over time. With proper care and built-in features, OLED TVs are reliable and offer exceptional picture quality.
This article explores the causes of OLED screen burn-in, the science behind it, and effective prevention strategies. It covers signs, effects, and potential fixes, with practical tips to prolong your OLED display's lifespan and answers to common questions about burn-in.
OLED screens deliver unmatched image quality, with perfect blacks, vivid colors, and ultra-fast response times. Despite higher costs and some risk of burn-in, their advantages make them the top choice for premium displays in TVs, smartphones, and monitors.