
Views: 222 Author: Tina Publish Time: 2025-02-27 Origin: Site


Content Menu
● Understanding LCD Display Shields
>> Benefits of Using LCD Display Shields
● Types of LCD Display Shields
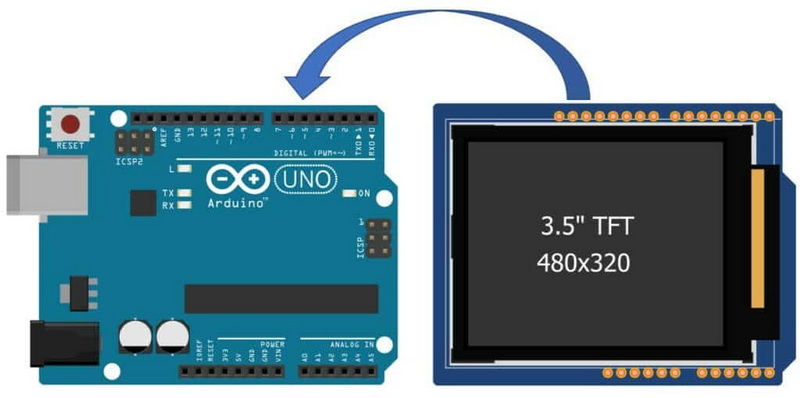
● Connecting the LCD Shield to Arduino Uno
>> Step 1: Gather Your Materials
● Understanding the LCD Shield Pinout
>> Installing the Required Library
>> Displaying Text and Numbers
● Troubleshooting Common Issues
>> Garbled Text
>> Integrating with Other Sensors
>> Creating Graphical Interfaces
>> 1. What is the difference between a character LCD and a graphical LCD?
>> 2. Can I use an LCD shield with other Arduino boards?
>> 3. How can I adjust the contrast of my LCD display?
>> 4. Is it possible to use multiple LCD shields with one Arduino?
>> 5. How can I create animations on my LCD display?
Connecting an LCD display shield to an Arduino Uno is a popular project among electronics enthusiasts and makers. This comprehensive guide will walk you through the process of connecting and using an LCD display shield with your Arduino Uno, providing detailed instructions, tips, and troubleshooting advice. Whether you're a beginner or an experienced Arduino user, this guide will help you master the art of integrating LCD displays into your projects.
LCD display shields are convenient add-ons for Arduino boards that provide a visual interface for your projects. They typically include a 16x2 character LCD screen and often come with additional features like buttons for user input. These shields are designed to stack directly on top of the Arduino Uno, making them easy to integrate into your projects without the need for complex wiring.
1. Easy Integration: LCD shields are designed to fit perfectly on top of the Arduino Uno, eliminating the need for complex wiring.
2. Visual Feedback: They provide a clear and readable display for your project's output or status.
3. User Interaction: Many shields come with built-in buttons, allowing for user input without additional components.
4. Versatility: LCD shields can be used in a wide range of projects, from simple displays to complex interactive systems.
There are several types of LCD display shields available for Arduino:
1. Standard 16x2 LCD shields: These are the most common and versatile options for beginners. They display 16 characters across 2 lines and are suitable for most basic projects.
2. I2C-enabled LCD shields: These use the I2C communication protocol, which reduces the number of pins required to control the display. This leaves more pins available for other components in your project.
3. TFT color LCD shields: These offer full-color displays and higher resolutions, making them ideal for more advanced projects that require graphical interfaces.
4. OLED display shields: While not technically LCD, OLED shields offer high contrast and low power consumption, making them suitable for portable projects.
This guide will primarily focus on the standard 16x2 LCD shield, which is the most common and versatile option for beginners.

Before you begin, make sure you have the following:
- Arduino Uno board
- LCD display shield (16x2 characters)
- USB cable for Arduino
- Jumper wires (if needed)
- Computer with Arduino IDE installed
Most LCD shields are designed to stack directly on top of the Arduino Uno. Carefully align the pins of the shield with the headers on the Arduino board. Pay attention to the pin labels on both the shield and the Arduino to ensure correct alignment.
Gently press the shield onto the Arduino Uno, ensuring all pins are properly seated. The shield should fit snugly on top of the Arduino board. If you encounter any resistance, double-check the alignment and try again. Never force the connection, as this could damage the pins or the boards.
Connect your Arduino Uno to your computer using the USB cable. The LCD backlight should turn on, indicating that the shield is receiving power. If the backlight doesn't turn on, check your connections and ensure that your Arduino is properly recognized by your computer.
To effectively use your LCD shield, it's important to understand its pinout. Most 16x2 LCD shields use the following pin configuration:
- RS (Register Select): Usually connected to digital pin 8
- E (Enable): Usually connected to digital pin 9
- D4-D7 (Data pins): Usually connected to digital pins 4, 5, 6, and 7
- Backlight control: Often connected to digital pin 10
- Contrast control: Usually adjustable via a potentiometer on the shield
- Buttons: Typically connected to analog pin A0
Understanding this pinout will help you troubleshoot issues and customize your code if needed.
Now that your LCD shield is connected, it's time to program it to display text and other information. The Arduino IDE provides a simple and intuitive environment for writing and uploading code to your Arduino board.
Most LCD shields use the LiquidCrystal library, which comes pre-installed with the Arduino IDE. However, if you're using a different type of LCD shield or want to access advanced features, you may need to install additional libraries. Some popular libraries for LCD shields include:
- LiquidCrystal_I2C for I2C-enabled LCD shields
- Adafruit_GFX and Adafruit_TFTLCD for TFT color LCD shields
- U8g2lib for OLED displays
To install a library, go to Sketch > Include Library > Manage Libraries in the Arduino IDE, search for the library you need, and click "Install."
Once you have the necessary library installed, you can start writing code to control your LCD shield. Here's a breakdown of the basic steps:
1. Include the necessary library at the beginning of your sketch.
2. Initialize the LCD object with the correct pin numbers.
3. In the setup() function, initialize the LCD with the correct number of columns and rows.
4. Use functions like lcd.print() to display text on the screen.
To display text on your LCD, you can use the lcd.print() function. For example:
lcd.print("Hello, World!");
To display numbers, you can either convert them to strings or use the lcd.print() function directly:
lcd.print(42);

Many LCD shields come with additional features that you can utilize in your projects. Let's explore some of these advanced capabilities.
Most LCD shields include buttons for user input. These buttons are typically connected to a single analog pin (usually A0) through a resistor ladder. To read button presses, you'll need to use the analogRead() function and interpret the values based on the specific resistances used in your shield.
LCD displays allow you to create and display custom characters. You can define up to 8 custom characters using arrays of bytes that represent the pixel pattern. Once defined, these characters can be displayed just like any other character.
For messages that are longer than the display width, you can implement scrolling text. This involves repeatedly shifting the text left or right and updating the display.
Many LCD displays come with built-in special symbols like arrows, degree symbols, and mathematical operators. You can display these using their corresponding ASCII codes.
Even with careful setup, you may encounter some issues when working with LCD shields. Here are some common problems and their solutions:
If your LCD isn't displaying anything:
1. Check all connections between the shield and the Arduino.
2. Verify that the Arduino is receiving power and the code is uploaded successfully.
3. Ensure the correct library is installed and included in your sketch.
4. Double-check the pin assignments in your code match the physical connections.
If you see strange characters or symbols instead of the expected text:
1. Verify that the Arduino is supplying the correct voltage (usually 5V) to the shield.
2. Check the contrast adjustment potentiometer on the shield, if available.
3. Ensure that the LCD is properly initialized in your code with the correct number of columns and rows.
If the buttons on your shield aren't working as expected:
1. Verify that the analog pin for button reading (usually A0) is correctly connected.
2. Check the button resistance values in your code against the actual values used in your shield.
3. Ensure that your button reading code accounts for any debounce issues.
Now that you've mastered connecting and programming your LCD shield, here are some exciting project ideas to inspire you:
1. Digital Clock with Alarm: Create a clock that displays the current time and allows setting alarms.
2. Temperature and Humidity Display: Use sensors to measure environmental conditions and display them on the LCD.
3. Simple Game Interface: Develop a game like "Guess the Number" or a simple quiz using the LCD for display and buttons for input.
4. Menu-driven System Controller: Create a interface for controlling various aspects of a larger system, such as a home automation setup.
5. Data Logger with LCD Readout: Log data from sensors and use the LCD to display current readings and statistics.
6. Personal Finance Tracker: Develop a simple budgeting tool that allows input of expenses and displays totals.
7. Fitness Rep Counter: Create a device that counts and displays repetitions for various exercises.
8. Plant Monitoring System: Monitor soil moisture, light levels, and temperature for plants, displaying the information on the LCD.
9. Morse Code Translator: Build a device that allows input of text and displays the corresponding Morse code, or vice versa.
10. Digital Spirit Level: Use an accelerometer to create a digital level, displaying the angle on the LCD.
As you become more comfortable with using LCD shields, consider exploring these advanced topics:
Combine your LCD shield with various sensors like temperature sensors, light sensors, or motion detectors to create more complex and interactive projects.
For projects that require more extensive information display, learn how to use multiple LCD displays or upgrade to larger LCD screens.
Explore touch-enabled LCD shields to add more intuitive user interactions to your projects.
If you're working with TFT color LCD shields, delve into creating graphical user interfaces with buttons, sliders, and other interactive elements.
For battery-powered projects, investigate techniques for reducing power consumption, such as dimming the LCD backlight or putting the display to sleep when not in use.
Connecting an LCD display shield to your Arduino Uno opens up a world of possibilities for creating interactive and informative projects. With the knowledge gained from this guide, you should now be able to confidently connect, program, and troubleshoot your LCD shield. Remember to experiment with different features and functionalities to make the most of your new display capabilities.
As you continue to explore the world of Arduino and LCD displays, don't be afraid to push the boundaries of what's possible. Each project you create will build your skills and understanding, leading to even more impressive creations in the future. Whether you're building practical tools, entertaining games, or innovative interfaces, the combination of Arduino and LCD shields provides a powerful platform for bringing your ideas to life.

A character LCD is designed to display pre-defined characters and numbers, typically in a grid format (e.g., 16x2 or 20x4). A graphical LCD, on the other hand, can display custom graphics and images with individual pixel control. Character LCDs are simpler to use and require less processing power, while graphical LCDs offer more flexibility but are more complex to program.
Most LCD shields are designed to be compatible with the Arduino Uno and similar boards. However, pin compatibility may vary with other Arduino models. Always check the pinout and specifications of both your LCD shield and Arduino board before connecting them. Some shields may require additional wiring or code modifications to work with different Arduino models.
Many LCD shields have a small potentiometer on the back for adjusting contrast. Look for a small blue or white component that you can turn with a screwdriver. If your shield doesn't have this, you may need to add a 10k potentiometer between the contrast pin (usually labeled V0) and ground, with the wiper connected to the contrast pin.
While it's technically possible to use multiple LCD shields with a single Arduino, it's not recommended due to pin conflicts and power requirements. If you need multiple displays, consider using individual LCD modules or exploring I2C-based LCD solutions, which allow for multiple displays on the same I2C bus.
Creating animations on a character LCD involves rapidly updating custom characters or shifting text. You can define up to 8 custom characters and update them in quick succession to create simple animations. For more complex animations, consider using a graphical LCD or OLED display, which offer pixel-level control for smoother animations.


